
In the architectural hierarchy of residential design, few elements bridge the gap between heavy infrastructure and delicate aesthetics as effectively as kitchen island pendant lights. Often referred to within the interior design community as the "jewelry" of the kitchen, these fixtures serve a dual purpose that is critical to the room's success. Aesthetically, they act as vertical vectors that define the volume of the space, drawing the eye upward and establishing the room’s focal center. Functionally, they provide essential task lighting, delivering the specific illuminance required for food preparation, cleaning, and dining on the island surface.
However, selecting and installing these fixtures is not merely a matter of stylistic preference; it is a geometric and photometric engineering challenge. The kitchen island is often the busiest work plane in the home, requiring a lighting solution that balances lux levels (light intensity) with ergonomic clearance. A failure to adhere to precise measurements results in a chaotic visual environment. If a fixture is suspended too low, it creates an obstruction to the line of sight, severing the visual connection between the kitchen and adjacent living areas. If suspended too high, the light source loses its efficacy as task lighting and may introduce uncomfortable glare, known as Unified Glare Rating (UGR) issues, where the bulb becomes directly visible to the eye. Furthermore, improper spacing can result in "hot spots" of intense light flanked by shadows, rather than a uniform wash of illumination.
This kitchen island lighting guide is designed to eliminate the guesswork associated with these installations. Achieving a designer-grade finish requires treating the installation as a mathematical system rather than an artistic guess. We will move beyond general approximations and utilize specific formulas to determine optimal placement. For example, calculating the equidistant spacing ($S$) for multiple pendants relies on the island length ($L$) and the number of fixtures ($n$), often expressed in the formula:
$$ S = \frac{L}{n + 1} $$
This article serves as a comprehensive technical manual for mastering island pendant lights. We will deconstruct the standard industry heights, explore the variable adjustments required for non-standard ceiling elevations, and provide the definitive sizing rules to ensure your fixtures scale proportionally with your cabinetry. By adhering to these engineering principles, you will ensure that your kitchen lighting is not only visually stunning but also ergonomically sound and photometrically efficient.

Determining the vertical placement of lighting fixtures is not merely an aesthetic choice; it is an engineering constraint that impacts illumination spread, glare control, and visual ergonomics. To achieve a cohesive design, you must adhere to specific measurement datums. The industry consensus for pendant light hanging height is strictly defined relative to the countertop, not the floor.
For a standard kitchen with an 8-foot ceiling, the bottom rim of the pendant fixture should sit between 30 and 36 inches above the surface of the kitchen island. This creates a focused cone of light suitable for prep work without obstructing the view across the kitchen.
When hanging lights over kitchen island surfaces, you must account for the specific function of the fixture.
Standard rules degrade as architecture scales upward. In rooms with vaulted or cathedral ceilings, keeping the lights at the standard height can leave too much negative space between the fixture and the mounting point, making the lights appear tethered too low.
To determine how high to hang pendants over island configurations with ceilings exceeding 8 feet, engineers and designers apply a linear scaling adjustment. You should add 3 inches of suspension length for every additional foot of ceiling height.
We can express this adjustment mathematically. Let $H_{ceiling}$ represent the ceiling height in feet, and $H_{suspension}$ represent the distance from the countertop to the bottom of the fixture in inches.
For ceilings where $H_{ceiling} > 8$:
$$ H_{suspension} = 32" + [3" \times (H_{ceiling} - 8)] $$
(Note: We use 32" as a median base height for this calculation).
For example, with a 10-foot ceiling:
$$ H_{suspension} = 32" + [3" \times (10 - 8)] $$
$$ H_{suspension} = 32" + 6" = 38" $$
In this scenario, the pendant light height over island increases to 38 inches above the counter to maintain vertical proportionality.
While the pendant light length guide relies heavily on formulas, the final variable is human ergonomics. The fixture must not impede the line of sight (LOS) between people standing on opposite sides of the island.
Before finalizing the installation, verify the clearance against the height of the tallest household member. The bottom of the fixture should be at least 6 inches above eye level of the tallest user to prevent glare and physical obstruction. If the standard 30-inch height places the fixture directly in your sightline, adjust upward to the 36-inch limit. Functionality must always supersede the rigid application of design rules.
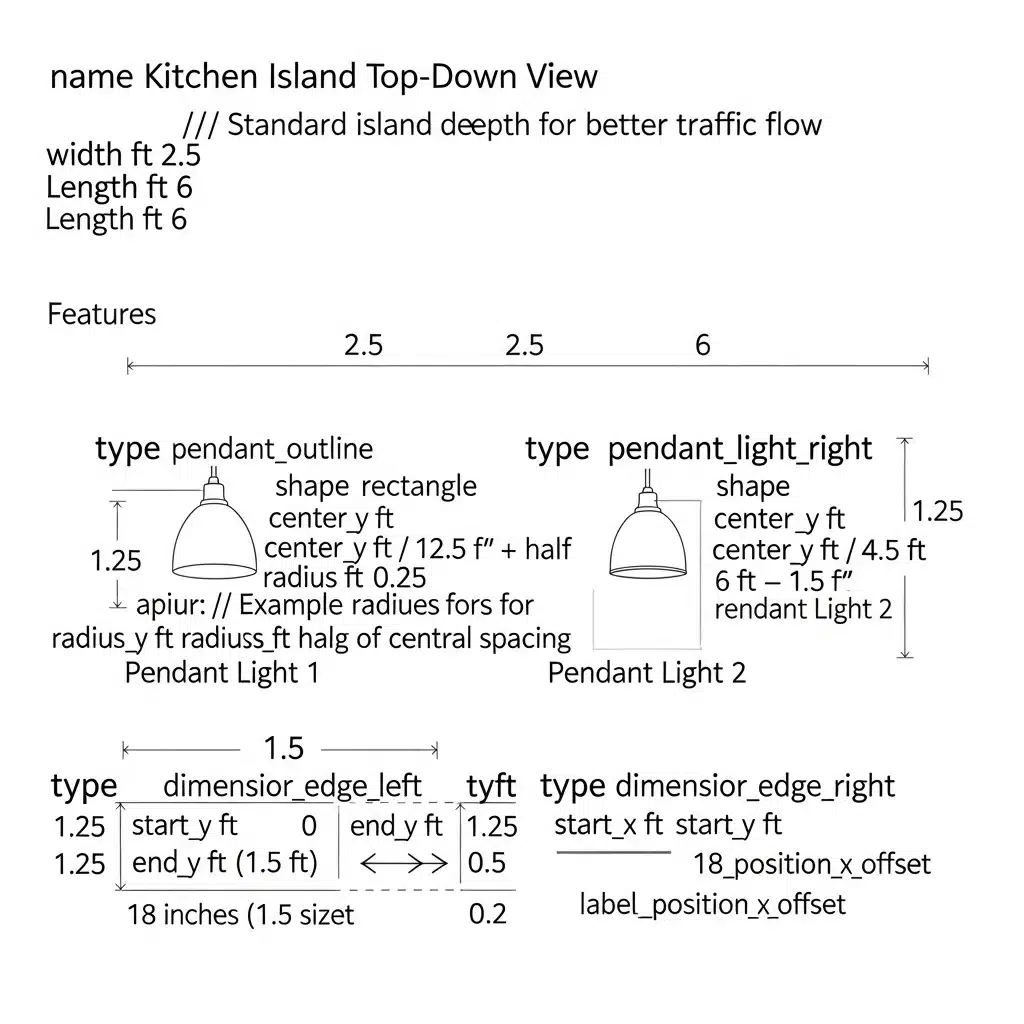
Achieving a polished look in kitchen design requires geometric precision. While height establishes the vertical plane, proper island pendant light spacing establishes the horizontal rhythm of the room. Incorrect spacing creates visual tension and unbalanced illumination. To ensure professional results, one must move beyond estimation and rely on specific algebraic formulas to determine the exact coordinates for pendant light placement over island surfaces.
Before calculating the position of the fixtures, you must define the usable ceiling area. A common engineering error is placing the outer fixtures too close to the edge of the island, resulting in head clearance issues and a crowded aesthetic.
The "Edge Rule" dictates the safe buffer zone between the edge of the countertop and the outer edge of the pendant.
If your calculations place the fixture within 6 inches of the island's end, you must reduce the number of pendants or decrease the distance between pendant lights over island fixtures.
To achieve perfect symmetry, where the negative space between the lights matches the negative space at the ends of the island, utilize the "Rule of Two" (or the Division Method). This method calculates the center-point for each junction box.
Let $L$ represent the total length of the island and $N$ represent the number of pendants. The spacing interval $I$ is calculated as:
$$ I = \frac{L}{N + 1} $$
To determine the location of each pendant ($P$) measuring from the left edge of the island ($0$), use the following sequence where $i$ represents the pendant number (1, 2, 3...):
$$ P_i = i \times I $$
Example Calculation:
For a 90-inch island ($L=90$) utilizing 2 pendants ($N=2$):
$$ I = \frac{90}{2 + 1} = 30 \text{ inches} $$
This method guarantees that the how to space pendant lights over island surfaces query is solved with equidistant gaps, creating a balanced visual load.
While the division formula ensures centering, you must cross-reference this with the industry standard for the distance between pendant lights over island units (bulb-to-bulb).
The general heuristic for standard-sized pendants (approx. 8–12 inches in diameter) is a center-to-center spacing of 30 inches.
To verify that your fixtures satisfy the spacing requirement, calculate the gap $G$ between the edges of two adjacent fixtures with diameter $D$ using center-to-center distance $S$:
$$ G = S - D $$
If $G < 12$ inches, the fixtures are likely too large or spaced too closely, creating a clustered appearance rather than a distributed array. Accurate pendant light placement over island layouts rely on maintaining this "air" between fixtures to allow the kitchen's architecture to breathe.
Determining the correct configuration for kitchen lighting is an exercise in proportion and geometry. Before selecting a specific fixture style, you must solve the equation of quantity versus scale. This decision matrix relies heavily on the linear footage of your workspace and the principle of visual weight.
The most common structural debate in kitchen design is 2 vs 3 pendant lights over kitchen island. While personal preference plays a role, the dimensions of the island dictate the feasibility of the arrangement.
The Rule of Odds
Design engineering often relies on the "Rule of Odds," which posits that odd numbers (3, 5) create a more balanced, harmonious composition than even numbers. A trio of lights provides a central focal point that anchors the eye, whereas two lights create symmetry that frames a specific view.
Linear Thresholds
To determine how many pendants over island surfaces are appropriate, apply the 7-foot threshold:
Once quantity is established, you must calculate what size pendant lights over island counters will fit without overwhelming the space. The size of the fixture must be proportional to both the length and the depth (width) of the island.
The Transverse Axis Formula (Depth)
To prevent head collisions and maintain visual balance, the diameter of the pendant must never exceed the island's depth minus a buffer zone. The industry-standard island pendant size guide formula is:
$$ D_{max} = W_{island} - 12\text{ inches} $$
Where:
For a standard 40-inch deep island, the maximum diameter is 28 inches. This ensures a clearance of at least 6 inches on both the front and back edges of the counter $$ \frac{12}{2} = 6 $$.
The Longitudinal Axis Formula (Length)
To ensure fixtures are not too small for the room, consider the aggregate diameter relative to the total length. A general engineering guideline for visual mass is that the combined diameter of all pendants should span approximately 40% to 50% of the island's length.
$$ \sum D_{fixtures} \approx 0.5 \times L_{island} $$
Physical dimensions are not the only metric; "visual weight" must also be calculated. A solid metal dome has a high visual weight and will feel larger than a clear glass globe of the exact same dimensions.
By strictly adhering to these formulas, you ensure that the lighting architecture integrates seamlessly with the kitchen's spatial volume.
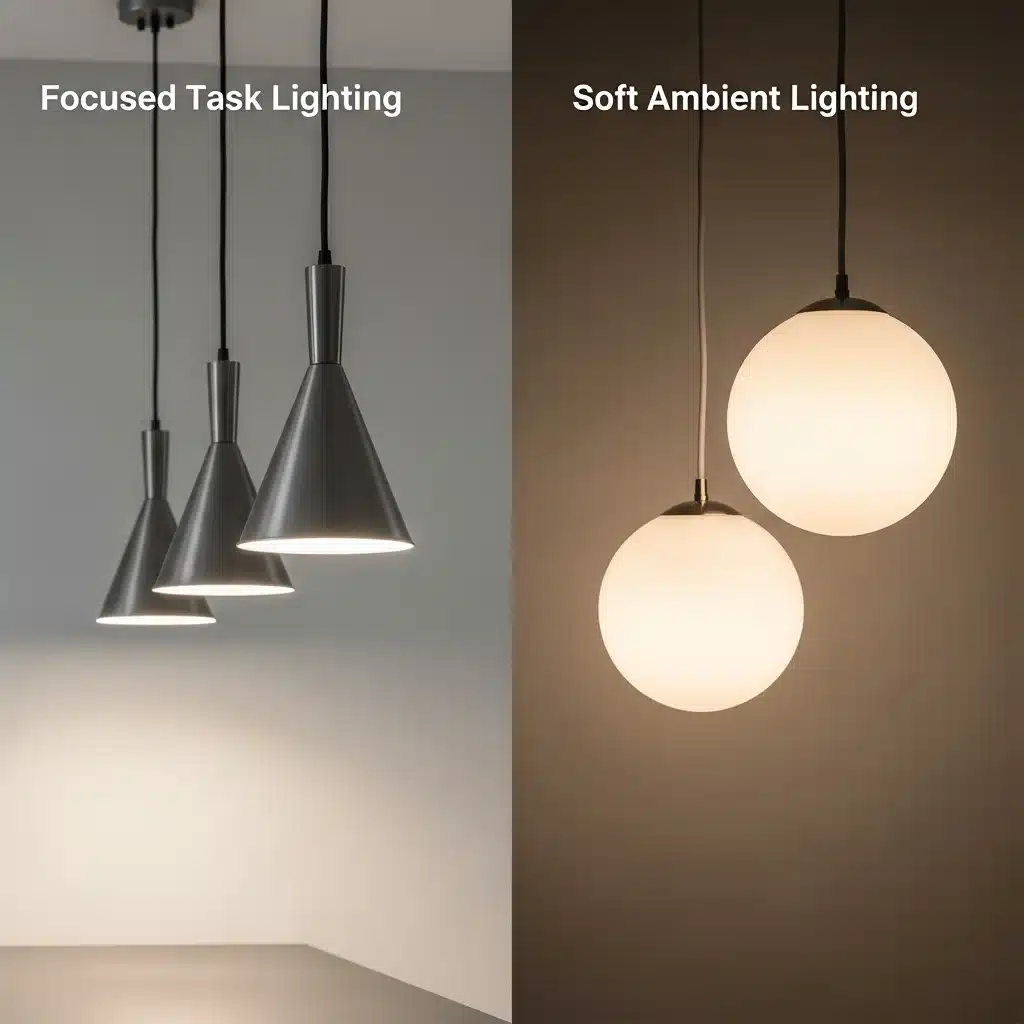
When selecting fixtures for a workspace, the engineering principle "form follows function" is paramount. Before focusing on aesthetics, you must determine the photometric requirements of your island. How to choose kitchen pendant lighting begins with distinguishing between directional task lighting and omnidirectional ambient lighting.
The geometry of the fixture shade dictates the light spread.
Task Lighting (Directional): If your island is the primary food preparation area (chopping, reading recipes), you require fixtures with opaque shades—typically metal, concrete, or dense ceramic—that utilize an open bottom. These fixtures channel light downward in a cone, maximizing foot-candles on the counter surface. To ensure adequate illumination, calculate the required luminous flux ($\Phi$) using the target illuminance ($E$) and the surface area ($A$):
$$ \Phi_{needed} = E \times A $$
For detailed kitchen work, target an illuminance ($E$) of 50 to 100 foot-candles.
Ambient Lighting (Omnidirectional): If your island serves primarily as a breakfast bar or buffet, ambient fixtures are appropriate. These typically feature translucent glass globes, fabric drums, or lantern styles that diffuse light $360^{\circ}$. While these provide excellent general illumination (filling the shadows in the room), they often lack the focused intensity required for safe knife work.
Once functionality is defined, focus on integrating the fixtures into your architectural palette. The best pendant lights for kitchen island designs do not simply match the room; they anchor it.
Current kitchen island lighting ideas lean heavily toward mixing organic materials with precision engineering. Here are the top configurations for the current design cycle:
By balancing the mathematical requirements of illuminance with material cohesion, you ensure your lighting is not only visually stunning but technically sound.
The aesthetic success of your kitchen lighting is entirely dependent on the precision of the electrical infrastructure hidden behind the drywall. While selecting fixtures is a design choice, placement is an engineering challenge. Correctly locating junction boxes (J-boxes) and selecting the appropriate control systems are critical steps that must occur during the rough-in phase, long before the final finishes are applied.
If you are remodeling, the placement of the J-box dictates the final position of the pendant. A common error is centering the boxes based on the room dimensions rather than the island dimensions.
To ensure perfect alignment, the J-boxes must be installed along the island's longitudinal axis. If the ceiling joists do not align with your calculated spacing coordinates, you cannot simply attach the box to the drywall; it will not support the static load of the fixture. You must install structural blocking (a bridge of wood, usually $2 \times 4$ lumber) between the joists to provide a secure mounting point for the electrical box.
Technical Tip: For heavy fixtures (exceeding 50 lbs), standard plastic nail-on boxes are insufficient. Utilize a fan-rated metal octagonal box or a heavy-duty box brace specifically engineered for dynamic or heavy static loads.
Kitchen islands serve multiple functions, ranging from food preparation (requiring high lux levels) to dining (requiring lower, ambient levels). Therefore, a simple single-pole toggle switch is inadequate. Integrating a dimmer is essential, but compatibility is key.
Modern LED pendants often require specific dimming protocols (e.g., TRIAC, ELV, or 0-10V). Mismatching an LED driver with an incompatible dimmer switch results in "drop-out" (where the light turns off before the slider reaches the bottom) or strobing.
Furthermore, you must ensure the dimmer switch is rated for the total electrical load. Calculate the total wattage ($W_{total}$) using the following summation:
$$ W_{total} = \sum_{i=1}^{n} (W_{fixture_i}) $$
Where $n$ is the number of pendants. For safety and longevity, electrical code suggests a continuous load should not exceed 80% of the switch's rated capacity ($C_{switch}$). Ensure that:
$$ W_{total} \le 0.80 \times C_{switch} $$
Many homeowners research how to install pendant lights over island counters assuming it is a simple wire-nut connection. However, the complexity varies significantly based on existing conditions.
Achieving a cohesive kitchen design is not merely a matter of selecting a fixture that complements your cabinetry; it is an exercise in architectural precision. As detailed throughout this guide, the difference between a high-end, custom look and a disjointed installation lies in the rigorous application of spatial mathematics. When the physics of light distribution meets the ergonomics of kitchen workflow, the result is a functional masterpiece.
Before committing to a purchase or cutting into drywall, perform a final specification review against the critical parameters established in this guide. Ensure your design plan adheres to the following engineering tolerances:
The vertical suspension height dictates both the spread of illumination (lux level on the counter) and the line of sight.
Uniformity is paramount. To ensure consistent foot-candles across the work surface and prevent visual crowding, adhere to the spacing algorithms:
To prevent the fixtures from overwhelming the spatial volume of the kitchen, verify the fixture diameter ($D_{fixture}$) against the island width ($W_{island}$):
$$D_{fixture} \leq W_{island} - 12"$$
Theoretical calculations must be validated by physical simulation. Before finalizing electrical rough-ins, we strongly recommend creating a 1:1 scale mock-up. Tape balloons or cardboard cutouts to string and suspend them from the ceiling at the calculated coordinates. This allows you to verify sightlines, check for interference with cabinet doors, and confirm that the scale feels appropriate within the specific volumetric constraints of your room.
Correcting a junction box location after the drywall is finished is a costly and invasive retrofit. By adhering to these metrics and verifying your layout physically, you ensure a flawless installation.